A child who wants a new Minecraft identity often begins with a clear idea—a football shirt, an explorer from the Andes, a favorite animal, or a character based on a drawing—but turning that idea into a readable block-style design is harder than expected. Families and young players may understand the character perfectly while lacking the pixel-art experience needed to translate clothing, colors, and facial features into a simple visual form.
Many online guides jump straight to generating an image and ignore the choices that determine whether it will be useful. A better approach starts with the character’s purpose, prepares a suitable reference, and checks the output before it enters a game, school activity, or public post. An AI Minecraft Skin Generator can shorten the conversion stage, but the player’s original concept and review still give the character its identity.
Why Custom Skin Ideas Lose Clarity
Minecraft-style characters have very little space for visual information. A detailed jacket, patterned football jersey, or realistic face may look distinctive in a photograph but become confused when reduced to large square forms. Strong contrast, recognizable color groups, and one or two signature details usually communicate more effectively than many tiny decorations competing for attention.
Reference images cause another difficulty. A dark selfie may hide the hair and clothing, while a full family photograph leaves the system guessing which person matters. The fastest workflow therefore begins by choosing material that clearly represents the intended character.
Prepare a Strong Character Reference
Good preparation reduces random revisions and helps the generated result preserve the details that matter. The following steps work for a portrait, a hand-drawn character, or a simple outfit concept.
- Define the Character’s Main Role
Write a short description of who the character is and where it will appear. A survival-world explorer needs a different visual identity from a streamer avatar, a classroom history figure, or a mascot for a group project. Choose three descriptive words—such as practical, adventurous, and local—to keep later decisions consistent. If a detail does not support those words, it probably does not belong in the first version.
- Select One Clear Reference
Choose a bright JPG or PNG with an unobstructed subject and a background that does not merge with the clothing. When using a person’s photo, a front or three-quarter view makes the face, hair, and upper outfit easier to interpret. When using a drawing, finish the major shapes and colors first; unfinished pencil marks may be treated as intended costume details.
- Simplify the Color Palette
Identify a main color, a secondary color, and one accent before generating. A Salta-inspired explorer, for example, might borrow earthy mountain tones without copying a flag, uniform, or cultural garment inaccurately. Keeping the palette limited makes the character easier to recognize from a distance and leaves room for a scarf, badge, belt, or other identifying feature.
- Choose One Signature Feature
A strong skin should be describable by one memorable element: a green hood, red boots, a striped sleeve, a sun emblem, or a distinctive hairstyle. Avoid adding all of them at once. One focal feature gives friends and viewers a quick way to recognize the character, while secondary details can be developed in later variations.
- Remove Private Image Details
Crop out school names, house numbers, identity cards, vehicle plates, and unrelated faces before uploading. Parents should supervise the use of children’s photographs and consider whether a drawing or fictional reference could achieve the same goal with less personal data. Creative convenience is not a reason to share more information than the project requires.
Generate and Review the Skin Carefully
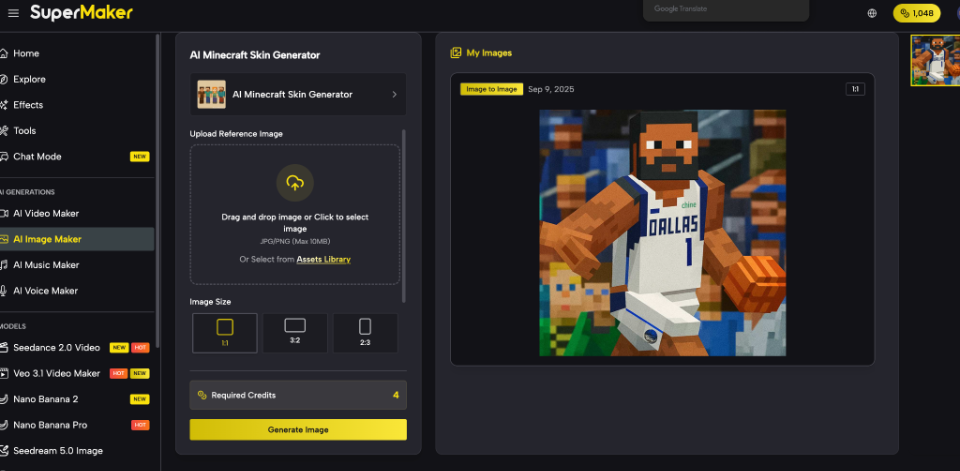
Once the concept is stable, the technical process becomes simpler. Upload the prepared reference, choose an available image shape, select how many alternatives to generate, and preview the results. The page accepts JPG or PNG references and offers 1:1, 3:2, and 2:3 formats, with the option to request between one and four images. These choices concern the generated presentation, so players should still confirm that the downloaded PNG works as expected in their intended Minecraft edition or launcher.
Using an AI Minecraft Skin Generator is most effective when each round answers a specific design question. Generate a small set to compare overall direction, select the version with the clearest silhouette, and then review the head, front, back, arms, and legs where visible. Do not keep producing alternatives without noting what needs improvement; repeated generation is useful only when it moves the character closer to the original brief.
- Check Recognition at Small Size
Reduce the preview until it resembles the size of a character seen during ordinary play. The main colors and signature features should remain visible. If the identity disappears, simplify the outfit or strengthen the contrast rather than adding more detail.
- Check Every Visible Body Area
A polished front view can hide mismatched sleeves, broken patterns, or inconsistent colors elsewhere. Rotate or inspect the available views whenever possible. Pay particular attention to edges where the torso meets the arms and where trousers meet shoes, because interrupted patterns are noticeable during movement.
- Check the File Before Sharing
Keep an untouched copy of the downloaded PNG and name it clearly. Test it privately before sending it to friends or using it in a group activity. If the file behaves like a character concept image rather than an import-ready skin template, treat it as design inspiration and complete the required layout in an appropriate skin editor instead of promising direct compatibility.
Apply Skins to Meaningful Local Projects
A custom character becomes more valuable when it supports an activity rather than serving as a one-time novelty. For a family world, each person could choose one color and one object connected to a shared building task. The characters remain individual, but the limited visual system makes them feel like a group. This approach works especially well when adults and children plan the identities together before playing.
Schools and youth workshops can use the same process for digital storytelling without turning the lesson into a competition for the most dramatic image. Students might design fictional residents for a sustainable town, interpret a historical occupation, or create explorers for a geography project about northwestern Argentina. The learning comes from explaining the character choices, checking sources, and revising the design—not merely pressing the generate button.
Content creators and community groups can develop a small visual cast for tutorials, event announcements, or collaborative challenges. Each character should have a defined role and distinct palette, while thumbnails and captions provide the context that a skin cannot communicate alone. If the content is public, creators should state when AI assisted the design and avoid presenting Minecraft branding or familiar characters as an official partnership.
Protect Originality While Sharing Designs
Use references you created, licensed, or received permission to adapt. Do not copy another player’s skin and change only its colors, and be cautious with logos, sports crests, branded uniforms, or familiar fictional characters. An original combination of clothing, palette, and backstory is more personal and easier to develop in later projects.
A skin can be copied after it is posted publicly, so decide whether the design is private, limited to a group, or intentionally reusable. Families can share the finished character while keeping the original portrait offline. This shows the creative result without circulating more personal material than necessary.
Thoughtful Design Creates Lasting Game Identities
A useful Minecraft-style character begins with a role, a clean reference, a limited palette, and one recognizable feature. Careful generation then turns those decisions into options that can be compared, tested at small size, and checked across the full character. Privacy, file compatibility, and permission should be part of the workflow rather than problems considered after publication.
The deeper benefit is learning how to move from an idea to a visual system that other people can understand. When families, students, and local creators plan before generating and revise with a clear purpose, a custom skin can support longer stories, shared worlds, and creative learning while remaining genuinely connected to the person who imagined it.